

Grabbing just a piece of your screen on a Mac is something I do dozens of time a day. The quickest way to get it done is by hitting Shift-Command-4. Your cursor will instantly transform into a crosshair, ready for you to click and drag over the exact portion of the screen you need.
This is your bread-and-butter command for snagging a specific chart from a report, a funny comment, or an error message without all the extra clutter.
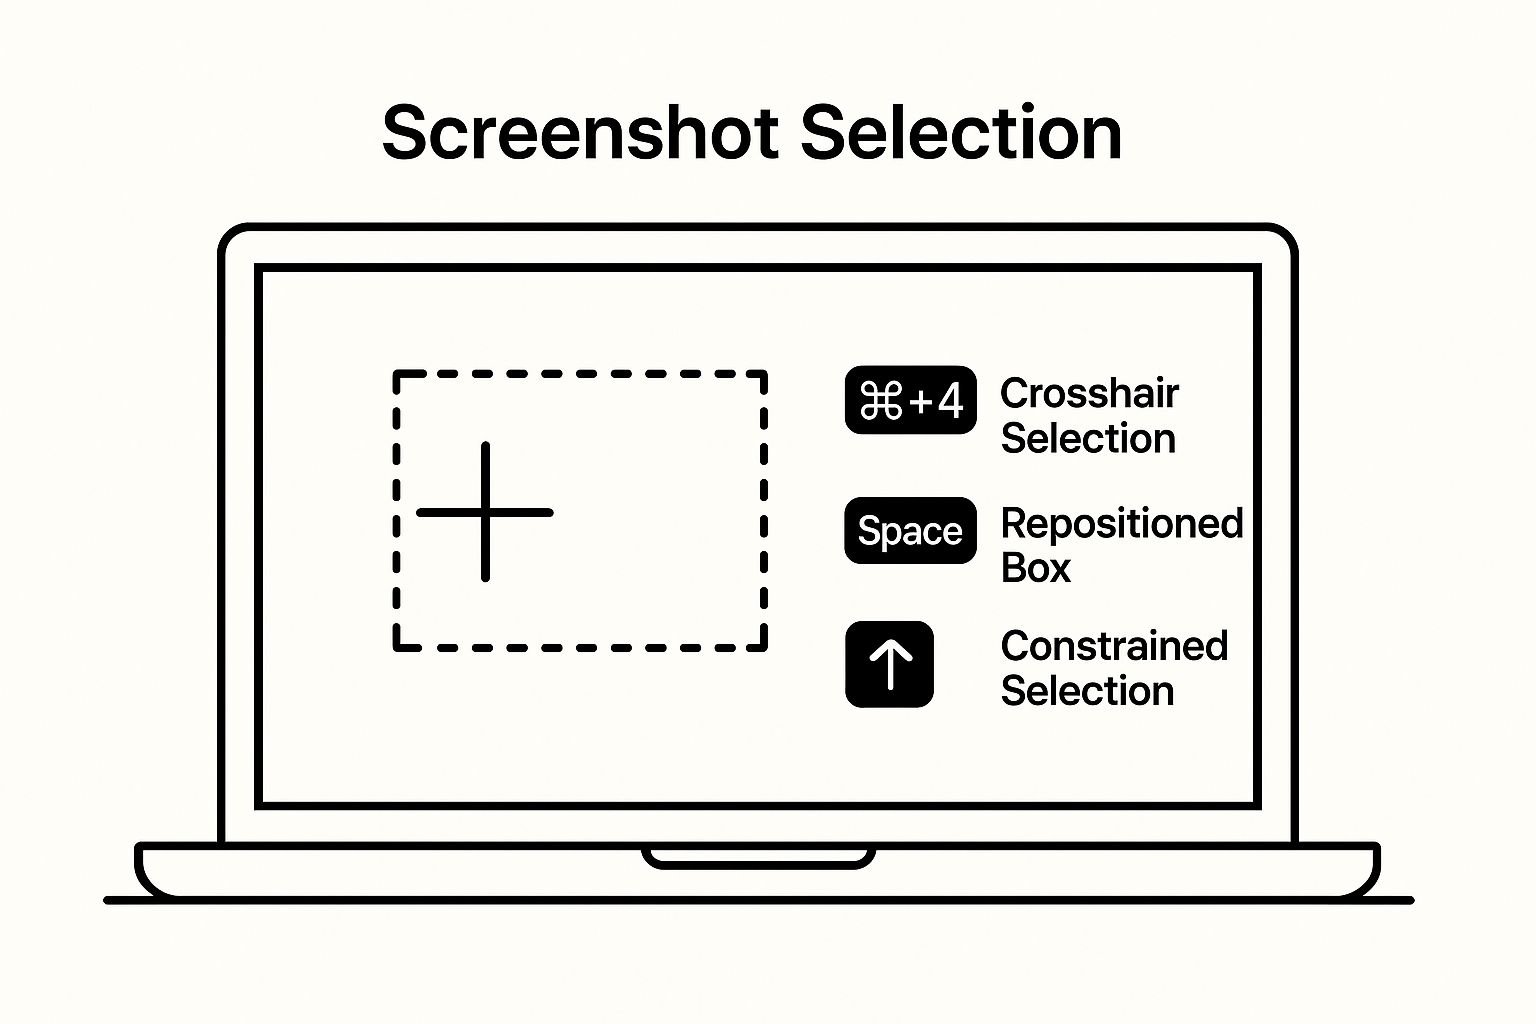
Master Your Mac Screenshot Selection
While Shift-Command-4 is the go-to for a quick screenshot selection mac users know and love, the real magic happens when you start using modifier keys while you’re dragging. This is where you go from just taking a screenshot to crafting the perfect one.
Ever started dragging and realized your selection is just a little bit off? It happens. Here’s a pro-tip: after you start dragging, press and hold the spacebar. This locks the size of your selection box but lets you move the entire thing around the screen. It’s an absolute lifesaver for getting the framing just right without having to start over.
Fine-Tuning Your Capture Area
Here’s another trick I use all the time. Hold down the Shift key after you start dragging your selection. This constrains the movement, locking the box’s aspect ratio. It’s perfect for capturing long, skinny elements like a single column in a spreadsheet or a specific menu without accidentally making it wider than you want.
The ability to reposition and constrain your selection on the fly transforms the basic screenshot tool into a precision instrument, saving you from tedious post-capture cropping.
These little keyboard tricks give you a surprising amount of control. You can see how these simple key presses work together to help you nail the perfect shot.
Mac Screenshot Selection Methods at a Glance
For those who want a quick reference, here’s how the main built-in selection tools stack up. Each one has its own specific use case, and knowing which one to grab saves a ton of time.
| Shortcut | Method | Best For | Key Feature |
|---|---|---|---|
Shift-Command-4 |
Crosshair Drag | Grabbing a custom rectangular area quickly. | Instant, direct capture of any screen portion. |
Shift-Command-5 |
On-screen Control Panel | More complex captures, including windows or menus. | Opens a full toolbar with multiple options. |
Shift-Command-4 + Spacebar |
Window/Menu Capture | Capturing a specific app window or menu. | Highlights and grabs a specific UI element. |
Each method has its place, but for pure speed and flexibility, mastering the Shift-Command-4 modifiers is a game-changer.
Of course, Apple’s built-in tools have come a long way. Pressing Shift-Command-5 now brings up a full-fledged Screenshot app, giving you options for capturing specific windows, setting timers, and even recording your screen. You can find more insights about Mac’s powerful screenshot capabilities if you want to dive even deeper.
Advanced Selection Techniques You’ll Actually Use
Once you get the hang of the basic click-and-drag, it’s time to dig into the more powerful features hiding in plain sight. These are the little tricks that take your screenshots from a quick grab to a polished, professional capture. The whole idea is to get the perfect selection from the start, so you can forget about clumsy cropping later.
Your command center for all this is the toolbar that pops up with Shift-Command-5. This simple overlay unlocks a much more deliberate way to capture your screen, moving way beyond a simple rectangle.
Capturing Windows and Menus Instantly
One of the most useful tricks in the book is grabbing a specific window or menu perfectly, without trying to manually trace its borders. It’s a huge time-saver.
After hitting Shift-Command-5, look for an icon that looks like a small window in the toolbar. Click it. Your cursor will magically turn into a little camera icon.
Now, just hover that camera over any open window or even a dropdown menu. You’ll see it light up with a subtle blue tint. One click, and you’ve captured that element—and only that element—with perfect edges.
Here’s the best part: macOS automatically adds a clean, professional-looking drop shadow around the window. This small detail makes your screenshot look intentional and well-designed, which is fantastic for tutorials, presentations, or client-facing documents.
Nudging for Pixel-Perfect Alignment
Ever drag out a selection and realize it’s off by just a few pixels? It’s frustrating. Instead of starting over, you can make tiny adjustments on the fly.
- After you start dragging a selection with
Shift-Command-4(but before you let go of the mouse), hold down the Spacebar. - Now you can move the entire selection box around the screen.
- Let go of the Spacebar to lock its position and continue adjusting the size.
This is an incredible trick for lining up your capture perfectly with specific UI elements without having to redo it three times.
And if you completely mess up or change your mind mid-selection, there’s an easy out. Just hit the Escape (Esc) key. The whole process cancels instantly, letting you start fresh without cluttering your desktop with failed attempts. These subtle controls are absolute game-changers once you know they exist.
Fine-Tuning Your Mac Screenshot Workflow
If you’re a power user, the default settings for anything rarely cut it. Thankfully, the built-in screenshot tools on your Mac are more flexible than you might think. A few smart adjustments can make a world of difference, saving you time and keeping your files in order.
The single most useful change you can make is deciding where your screenshots end up. By default, every capture lands directly on your Desktop, which can quickly turn into a chaotic mess of PNG files. There’s a better way.
Just hit Shift-Command-5 to pull up the screenshot toolbar. From there, click on “Options” and look under the “Save to” section. You can pick a different location—I highly recommend creating a dedicated “Screenshots” folder. It’s a small change that keeps your Desktop clean and all your captures neatly organized in one place.
Customizing Your Capture Settings
You can do more than just change the save location. A few other tweaks can help you get the perfect screenshot right from the start, saving you from editing later.
Here are a few settings I always adjust:
- Switch the File Format: Macs default to PNG, which is great for quality but often results in large files. If you’re taking screenshots for emails or the web, switching to JPG can save a lot of space. You can make this change with a quick command in the Terminal.
- Ditch the Drop Shadow: When you capture a window, macOS automatically adds a soft drop shadow. It looks nice, but it’s not always what you need, especially for clean, modern designs. This is another quick fix you can do in the Terminal.
- Use the Capture Timer: Back in the
Shift-Command-5“Options” menu, you’ll find a 5 or 10-second timer. This is an absolute game-changer for capturing things like drop-down menus or hover states that disappear the moment you try to take a screenshot.
Spending a few minutes setting this up now will streamline your entire process down the line. You’ll get the exact screenshot you need, in the right format and location, without any extra work. It’s a perfect example of working smarter, not harder.
When Built-In Tools Just Don’t Cut It
The native screenshot tool on a Mac is a workhorse. For quick grabs and simple markups, it’s often all you need. It’s powerful, it’s free, and it’s already there. But if you’re creating visuals for tutorials, client presentations, or marketing materials, you’ll eventually feel its limitations.
That’s usually the point where you start looking for something more. The trigger is often a specific need: maybe you have to blur out sensitive client data, add a sequence of numbered steps to a how-to guide, or you’re just tired of your desktop being a graveyard of old screenshot files.
The Real Advantage of a Dedicated Screenshot App
This is where specialized apps come in. The big difference isn’t just about capturing a piece of your screen; it’s about turning that raw capture into a polished, professional-looking graphic without ever leaving the app. You’re not just taking a picture; you’re creating a finished visual asset.
Think about the time saved. Instead of taking a screenshot, opening it in an editor, and then manually adding effects, these tools bundle it all into one fluid motion.
They really shine with features like:
- Instant Polish: Automatically wrap your screenshot in a browser frame, add a clean background, or apply a subtle drop shadow to make it pop.
- Smarter Annotations: Go beyond basic arrows and text with tools like numbered steps that automatically increment, or perfectly curved arrows to pinpoint specific elements.
- One-Click Sharing: The best feature for me? Capturing a shot and instantly getting a shareable link copied to my clipboard. It’s perfect for dropping into Slack, a Jira ticket, or an email without a second thought.
A dedicated screenshot tool understands that a screen capture isn’t just an image—it’s a form of communication. Its entire purpose is to make that communication clearer, faster, and more professional.
This need for better visual communication has led to some fantastic apps. Tools like Xnapper, Snagit, and Lightshot all bring something different to the table, from lightning-fast sharing to deep editing capabilities. If you’re curious, this comparison of top Mac screenshot tools is a great place to see what’s out there.
This is exactly the niche that a tool like GrabShot.io was designed for. It’s built to take that simple selected area and turn it into something genuinely impressive, because a well-designed visual can often say more than a wall of text ever could.
Putting It All Together with GrabShot.io
Theory is great, but let’s walk through a real-world example. Say you’re putting together a quick tutorial for a new software feature. You need a visual that’s more than just a picture—it needs to be clean, clear, and professional. A standard screenshot just won’t cut it.
First things first, you need the initial capture. I always start with the built-in Mac tool: Shift-Command-4. It’s the go-to shortcut for a precise screenshot selection mac power users love. Just drag the crosshair over the exact part of the app you want to highlight, leaving out all the desktop clutter and other browser tabs.
This raw image is our canvas. It’s functional, sure, but it’s not going to impress anyone. This is where a tool like GrabShot.io comes in and does the heavy lifting, turning a basic capture into something polished in just a few clicks.
From Raw Capture to Polished Visual
Once you’ve uploaded that raw screenshot to GrabShot.io, the fun part begins. The whole platform is built to add that professional sheen to your images without you having to fire up Photoshop or Figma. The transformation is immediate.
Here’s how I typically level-up a screenshot for a guide:
- Add a Custom Background: A plain white or transparent background is boring. I’ll drop in a subtle gradient or a color from our brand palette. This one change makes the screenshot look deliberate and helps it pop on a blog post or slide deck.
- Apply a Browser Frame: If the screenshot is from a web app, wrapping it in a simple browser frame gives it instant context. It looks a thousand times better than a random floating rectangle.
- Use Smart Annotations: This is key for clarity. I’ll use numbered callouts to guide the user through a series of steps or simple arrows to point out a specific button. It directs the viewer’s eye exactly where it needs to go.
The goal isn’t just to make a screenshot pretty; it’s to make it clearer. A well-designed visual cuts down on confusion and helps people grasp your point in seconds.
The difference between the starting point and the final result is night and day. What was a simple, functional screen grab is now a high-quality visual asset, ready for a knowledge base, a tutorial, or a social media post. It’s a perfect example of how the right tool can turn a basic picture into an effective communication tool in minutes.
Why a Great Screenshot Is More Than Just an Image
In a world that runs on visuals, a screenshot is way more than just a quick picture of your screen. It’s a powerful communication tool. For anyone who’s ever tried to explain something complicated over a team chat, you know that a precise and clean screenshot selection mac users can master is the difference between getting your point across instantly and causing total confusion.
Think about customer support guides. Instead of writing out a novel trying to describe where to click, a series of well-annotated screenshots can walk a user through a fix, step by step. This approach cuts down on frustration and gets problems solved much faster. It’s about showing, not just telling.
The Strategic Value of a Polished Visual
The impact of a great screenshot doesn’t stop with internal teams or support docs. When you’re creating marketing materials or posting on social media, a polished visual can be the very thing that makes people stop scrolling. It makes complex information easy to digest and share, turning a simple software update into something genuinely interesting.
This quality has a direct effect on how people perceive your work. Take the Apple App Store, for instance. Developers can upload up to ten screenshots for their app’s page. For many potential customers, those images are the first real look they get at the app. High-quality, carefully framed visuals build trust and can have a real impact on download numbers. It’s a critical part of making a good first impression, as explained in this guide on optimizing app store visuals for better conversion.
A screenshot isn’t just a file; it’s an asset. Learning how to capture and refine it isn’t just a technical skill—it’s a strategic advantage. Every time you grab a piece of your screen, you have an opportunity to communicate more clearly and professionally.
At the end of the day, taking a moment to create a great screenshot shows you care about the details. It respects the other person’s time by making information as clear and accessible as possible. It’s a small effort that really does pay off.
Ready to turn your basic screen captures into something more? Give GrabShot.io a try and see how easy it is to create professional, compelling visuals. You can start for free today.