
When you need to grab a screenshot and crop it on Windows, your quickest built-in method is the Windows Key + Shift + S shortcut. This command immediately brings up the Snipping Tool overlay, letting you select, crop, and copy a specific part of your screen straight to the clipboard.
Choosing Your Screenshot Crop Windows Method
So, which tool should you use? The best way to screenshot and crop on Windows really boils down to one thing: how often you do it and what you need to do with the image afterward.
Are you just grabbing a quick snapshot for a friend, or are you documenting an entire workflow for a training manual? Your answer will tell you whether the standard built-in tools are good enough or if you need to bring in something more powerful to get the job done right.
For the occasional screenshot, the native Snipping Tool is fine. It’s already there, no installation needed, and it handles basic rectangular snips, free-form captures, and full-screen grabs without any fuss. But if you’re a developer, marketer, or support specialist who lives in screenshots all day, that simplicity starts to feel like a roadblock.
Understanding the Trade-Offs
It all comes down to a trade-off between what’s available instantly and what saves you the most time in the long run.
Think about these common situations:
- Bug Reporting: A developer needs to capture a visual glitch in a dropdown menu, but the menu vanishes the moment you click away from it.
- Content Creation: A marketer wants to snag a specific customer review from a busy webpage to use in a social media post.
- Client Support: A support agent has to quickly mark up an error message to show a customer exactly where to click.
In these moments, speed, easy annotation, and simple sharing are everything. The demand for tools that deliver this is huge. The market for website screenshot software was valued at USD 1.4 billion in 2024 and is expected to grow fast, which just shows how many people are moving beyond the basics. You can read more about this trend and its drivers.
This handy little decision tree helps visualize when to stick with the basics and when to upgrade.
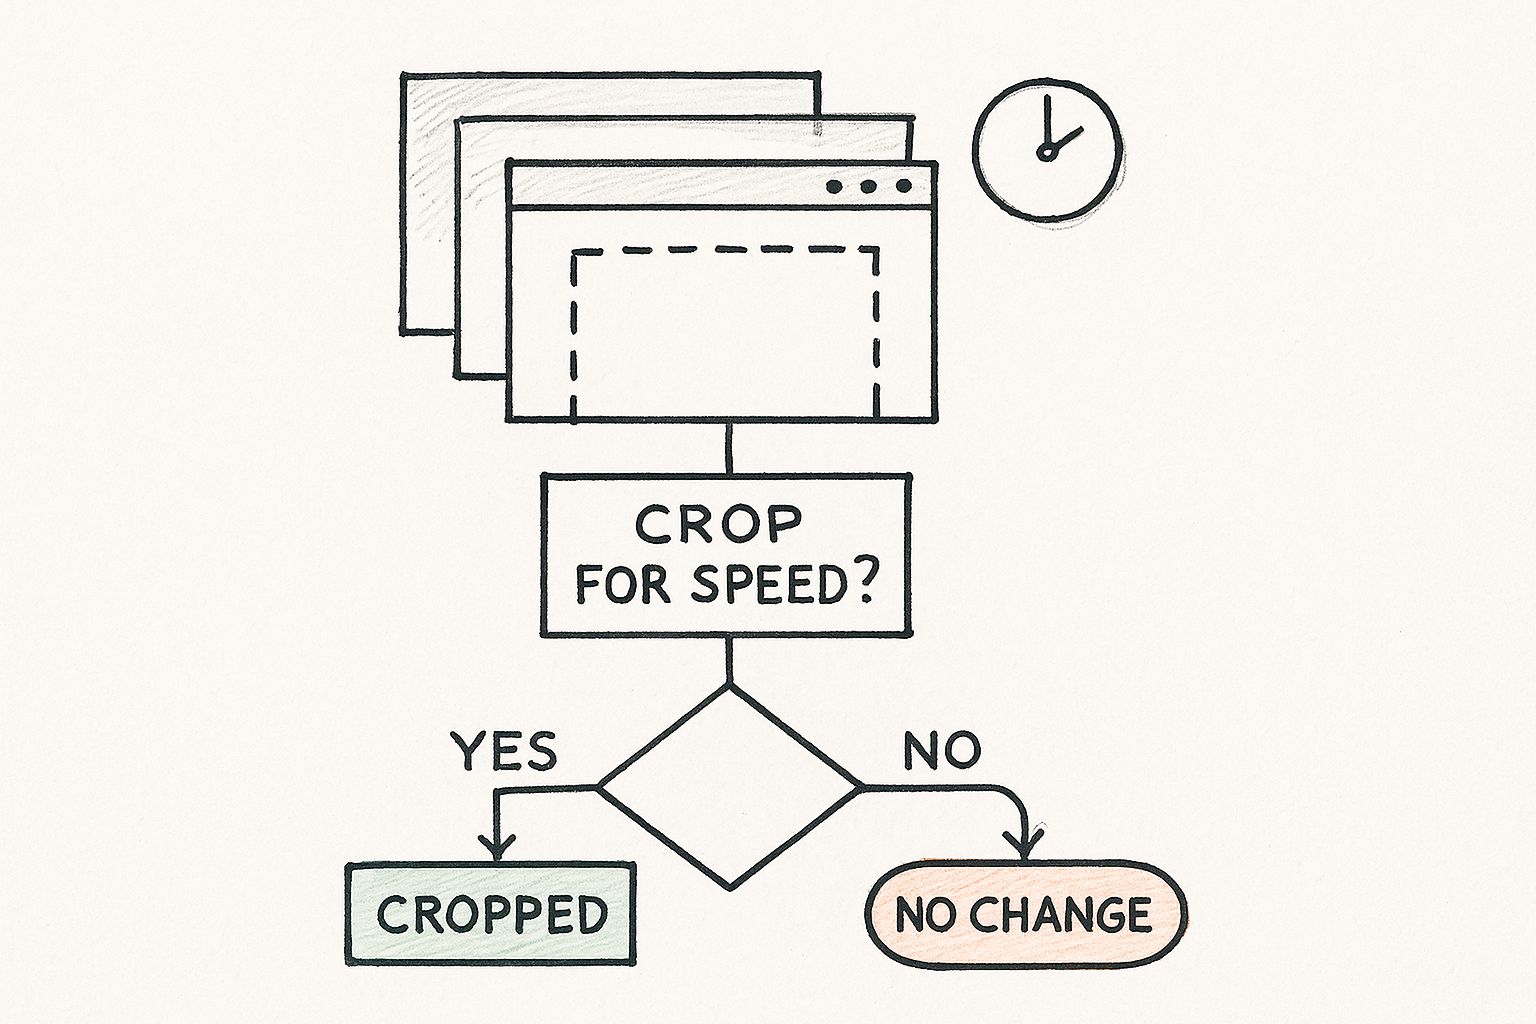
As you can see, while Windows’ own tools are great for simple, one-off tasks, a dedicated tool like GrabShot.io becomes a game-changer when your work depends on frequent, detailed, or collaborative screenshots.
Windows Screenshot Tools At a Glance
To make the choice even clearer, here’s a quick breakdown of how the default Windows tool stacks up against a more specialized solution.
| Feature | Windows Snipping Tool | GrabShot.io |
|---|---|---|
| Capture Speed | Good (shortcut-based) | Excellent (AI-powered, one-click) |
| Cropping | Manual selection | Manual + AI auto-selection |
| Editing & Annotation | Basic (pen, highlighter) | Advanced (arrows, text, blur, shapes) |
| Cloud Storage | Manual (via OneDrive) | Automatic, built-in |
| Sharing | Manual (paste or save file) | Instant shareable links |
| Workflow | Multi-step: capture, open, edit, save | Single-step: capture, auto-upload, share |
Ultimately, the Snipping Tool is a reliable hammer for simple jobs. But when you need a full toolkit for professional-grade work, a dedicated app delivers the speed and features that modern workflows demand.
Getting More from Windows Built-In Tools
Before you go hunting for a new app, it’s worth getting to know the powerful tools already baked into your computer. The native options to screenshot crop windows are a lot more sophisticated than the old-school Print Screen button. Honestly, they’ve got more flexibility than most people give them credit for, making them solid contenders for most day-to-day tasks.
These tools didn’t just appear out of nowhere. They’re the result of decades of demand for better ways to create visual documentation, especially in business. As software interfaces got busier, a full-screen capture just created more work. This reality pushed Microsoft to build more precise cropping features for everything from reporting bugs to creating marketing materials. If you’re curious, you can explore more about the history of screenshot software and its market growth.
Mastering the Snipping Tool and Its Shortcuts
The fastest way to grab a shot is with the Windows Key + Shift + S shortcut. Tapping those three keys instantly dims your screen and pops up a small menu at the top, giving you a few different ways to capture what you see. Forget digging through the Start menu; this shortcut is the most direct route to a quick, cropped screenshot.
Here’s a quick rundown of the modes and when I find them most useful:
- Rectangular Snip: This is your workhorse. Just click and drag a box around the exact area you need. It’s perfect for grabbing a specific paragraph, a chart, or a product image from a website without any extra clutter.
- Free-form Snip: Ever need to capture something with a weird shape, like a logo on a complicated background or a specific route on a map? This mode lets you draw any outline you want, giving you total control over the crop.
- Window Snip: This one is a massive time-saver. Instead of trying to painstakingly draw a perfect rectangle around an application window, just pick this mode and click on the window you want. It grabs the whole thing perfectly, drop shadow included.
- Fullscreen Snip: The classic. It does exactly what it says on the tin—captures every pixel on your screen, just like the old Print Screen key.
You can see the modern Snipping Tool interface here, which lays out these distinct capture modes clearly.
The main thing to remember is that you’ve got several specialized options ready to go with a single shortcut. It’s a far cry from the old one-size-fits-all approach.
Pro Tip: I highly recommend remapping the PrtScn key to launch the Snipping Tool directly. Just head to Settings > Accessibility > Keyboard and turn on “Use the Print Screen button to open screen snipping.” It’s a small tweak, but it makes the whole process feel even more seamless.
The Frustrations of Built-in Windows Tools
Let’s be honest, the built-in screenshot tools in Windows are fine for grabbing a quick image of your screen. They get the job done. But if you’re taking screenshots as part of your actual job, you’ll hit their limits pretty fast.
Think about being a QA tester trying to document a bug. It’s a five-step process. With the Snipping Tool, you have to capture the first screen, save it, name it, and then do it all over again four more times. You end up with a folder full of separate files that you then have to piece together into a coherent report. It’s clunky.
This isn’t just a minor annoyance—it’s a genuine productivity killer. When you’re capturing dozens of screenshots a day, all those extra clicks for saving, naming, and organizing add up. Your workflow slows to a crawl.
Where the Pros Get Stuck
The fundamental problem is that Windows tools are designed for one-off captures, not for professional-grade workflows. They’re missing the features you actually need to work efficiently.
Here’s where you’ll really feel the pain:
- No Scrolling Capture: Ever tried to capture an entire webpage for a design mockup? With the native tools, you can’t. You’re stuck taking several screenshots and painstakingly stitching them together in another app.
- Constant, Repetitive Annotations: If you need to highlight the same UI element across multiple screenshots, you have to open each file, add your arrow or text box, save it, and close it. There’s no easy way to keep your annotations consistent without a ton of extra work.
- Manual-Only Cropping: These tools are completely reliant on you dragging a perfect box every single time. There’s no intelligence to help you snap a crop to a specific button, menu, or image, which means a lot of fiddly adjustments.
In a professional context, every second counts. It’s not just about speed; it’s about eliminating repetitive, manual tasks. Native Windows tools trap you in a cycle of capture-save-repeat that becomes a major bottleneck when you’re dealing with a high volume of screenshots.
A Better Way to Work: AI-Powered Screenshot Tools
Let’s be honest, the built-in tools get the job done, but they can feel clunky. The whole process—capture, open, edit, save, then finally share—has way too many steps. This is exactly where modern, AI-powered tools come in to save the day. They aren’t just a different way to screenshot crop windows; they completely rethink the entire workflow.
Instead of trying to nail the perfect crop by hand, these tools are smart enough to identify elements on the page. Think about grabbing a specific button or a block of text for a support ticket. An AI-assisted tool lets you snap directly to that element. This saves you those few seconds of fiddling and, more importantly, spares you from those messy, imprecise crops we’ve all been guilty of. For anyone who needs pixel-perfect results without the headache, this is a huge deal.
More Than Just a Snapshot
The real magic happens after you’ve taken the screenshot. This is where a simple screen grab becomes a powerful communication tool, all in one go.
These are the kinds of features that make a real difference in my daily work:
- Instant Cloud Sharing: Forget saving files to your desktop. The screenshot is uploaded automatically, and a shareable link lands right on your clipboard.
- Built-in Markups: All the tools you need—arrows, text, highlighters, blur effects—are right there. No need to open another program to add annotations.
- Smart Privacy: Some tools can even spot and automatically blur out sensitive info like names and email addresses, which is a lifesaver for sharing publicly.
This push toward smarter, faster tools is a big deal. The screen capture software market hit a valuation of around $9.58 billion in 2024, and a lot of that growth is fueled by demand for AI and cloud features. You can read more about these market trends if you’re curious.
As a practical example, imagine a developer using a tool like GrabShot.io. They can spot a bug, capture it, add a quick note pointing out the problem, and have a link ready to paste into Jira or Slack in under ten seconds.
Here’s what a finished screenshot from GrabShot.io looks like—clean, professional, and ready to go.

Notice how it’s not just a raw image? It has a nice, clean border and a subtle shadow, making it look polished enough for a presentation or a blog post right out of the box.
The whole point of these modern tools is to shrink the distance between seeing something on your screen and clearly communicating it to someone else. They automate the boring stuff so you can get back to what you were actually doing.
Choosing the Right Screenshot Tool for You
When it comes to deciding how to screenshot crop windows, there isn’t a one-size-fits-all answer. The “best” tool really comes down to what you do with your screenshots and how often you take them. Your personal workflow is the deciding factor.
To keep it simple, think about which of these two profiles sounds more like you.
Are you a Casual Capturer? This is someone who snags a screenshot maybe a few times a week. You might be saving a recipe, sharing a funny social media comment with a friend, or just grabbing an order confirmation.
For these quick, infrequent tasks, the built-in Windows Snipping Tool is perfectly fine. It’s already on your computer, it costs nothing, and it handles the basics without any headaches.
The Professional Communicator
Then we have the Professional Communicator. This is someone whose job relies on clear, constant visual communication. Think of a software developer documenting a bug, a project manager giving feedback on a new design, or a support agent guiding a customer through a fix.
These professionals are taking dozens of screenshots every single day. For them, every extra click—to save, name, find, and then share a file—is a productivity killer. That wasted time adds up fast.
A powerful tool like GrabShot.io is an investment that pays for itself in reclaimed time and efficiency. The workflow is built for speed, turning a multi-step process into a single action.
To help you see the difference in a more practical way, let’s put the two tools head-to-head on the features that truly matter for a demanding, professional workflow.
Feature Showdown: Snipping Tool vs. GrabShot.io
Here’s a breakdown of how the standard Windows tool stacks up against a more specialized solution when you need to do more than just a simple snip and save.
| Advanced Feature | Windows Snipping Tool | GrabShot.io |
|---|---|---|
| Scrolling Capture | Not available | Yes, automated |
| Cloud Integration | Manual (via OneDrive) | Automatic, built-in |
| Advanced Annotations | Basic pen & highlighter | Arrows, text, blur, shapes |
| Shareable Links | No, must share file | Yes, instantly generated |
| AI Element Detection | Not available | Yes, for precise cropping |
As you can see, while the Snipping Tool is great for basic captures, GrabShot.io is designed from the ground up to eliminate friction and speed up a high-volume screenshot workflow. If you find yourself in the “Professional Communicator” camp, the advanced features can make a huge difference in your day.
Got Questions? We’ve Got Answers.
When it comes to screenshots, a few common questions always pop up. You’re trying to work faster, not get bogged down by clunky tools. Here are some quick answers to the problems you’re likely running into when trying to screenshot and crop on Windows.
What’s the Quickest Shortcut to Capture a Section of My Screen?
The fastest way using only what Windows gives you is Windows Key + Shift + S. This combo instantly pulls up the Snipping Tool’s overlay, letting you drag a box around exactly what you need. The selection is automatically copied to your clipboard, ready to paste.
For those who live and breathe efficiency, a dedicated tool can take this even further. Imagine setting a custom hotkey that not only captures a region but also uploads it and copies a shareable link to your clipboard—all in one press. That’s the kind of speed we’re talking about.
Can My Screenshots Be Saved Automatically?
Yes, they can, but the built-in options are pretty basic. If you dig into the Snipping Tool’s settings, you’ll find an option to automatically save your captures. By default, they all get dumped into your Pictures > Screenshots folder.
If you need more control, you’ll want something more robust. Third-party apps let you set up smart rules, like automatically naming files with the date or the application you captured. You can even have them save directly to a specific project folder in Google Drive or Dropbox without you lifting a finger.
How Can I Screenshot an Entire Scrolling Webpage?
This is a classic headache. The native Windows tools simply can’t do it. Your only option is to take a series of screenshots, painstakingly stitch them together in an image editor, and hope the seams don’t look too obvious. It’s slow, tedious work.
This is precisely why so many people look for a better tool. Professionals use software like GrabShot.io because it has a “Scrolling Capture” feature built right in. One click, and it does all the work, giving you a single, perfect image of the entire page.
Is There a Way to Capture a Dropdown Menu Before It Disappears?
Absolutely, and the Snipping Tool has a surprisingly useful trick for this. Open the full Snipping Tool application (not just the hotkey overlay) and look for the Delay option.
You can set a timer for 3, 5, or 10 seconds. Just click the timer, then open the dropdown menu you want to capture. The screen will freeze after the delay, letting you snip the menu perfectly. It’s a lifesaver for capturing those temporary interface elements that vanish the moment you click elsewhere.
Ready to stop juggling multiple tools and start creating beautiful, shareable screenshots in seconds? Try GrabShot.io for free and see how a smarter workflow can transform your productivity. Get started with GrabShot.io today.