
If you need to screenshot a single window on your Mac, there’s a specific keyboard shortcut that’s an absolute lifesaver: Command + Shift + 4, followed by a quick tap of the Spacebar.
Once you do that, you'll see your cursor magically transform into a little camera icon. From there, just hover over any open window and click. Boom. You've just captured a perfect, isolated image of that window—often complete with a subtle, professional-looking drop shadow—and it's already saved right to your desktop.
The Best Shortcut for Capturing a Single Window
Let's be honest, capturing just one application window is something most of us do all the time. Maybe you're putting together a quick guide for a coworker, sending a bug report to your IT team, or just grabbing a snapshot of a confirmation screen for your records.
While you could capture your whole screen and then painstakingly crop it down, why bother? The Command + Shift + 4 + Spacebar combo is tailor-made for this job, and it’s been a staple of the Mac experience for years. It’s a classic example of how macOS builds in powerful, efficient tools right out of the box.
This isn't some new feature, either. Apple integrated these screenshot shortcuts way back in the macOS X days, giving users a native way to capture their screen without hunting for third-party apps. That history is part of what makes the Mac so intuitive for creative and productivity tasks. In fact, the desktop OS market has seen a lot of changes over the years, as you can see from StatCounter's market share data.
This visual guide breaks down the simple key combination.
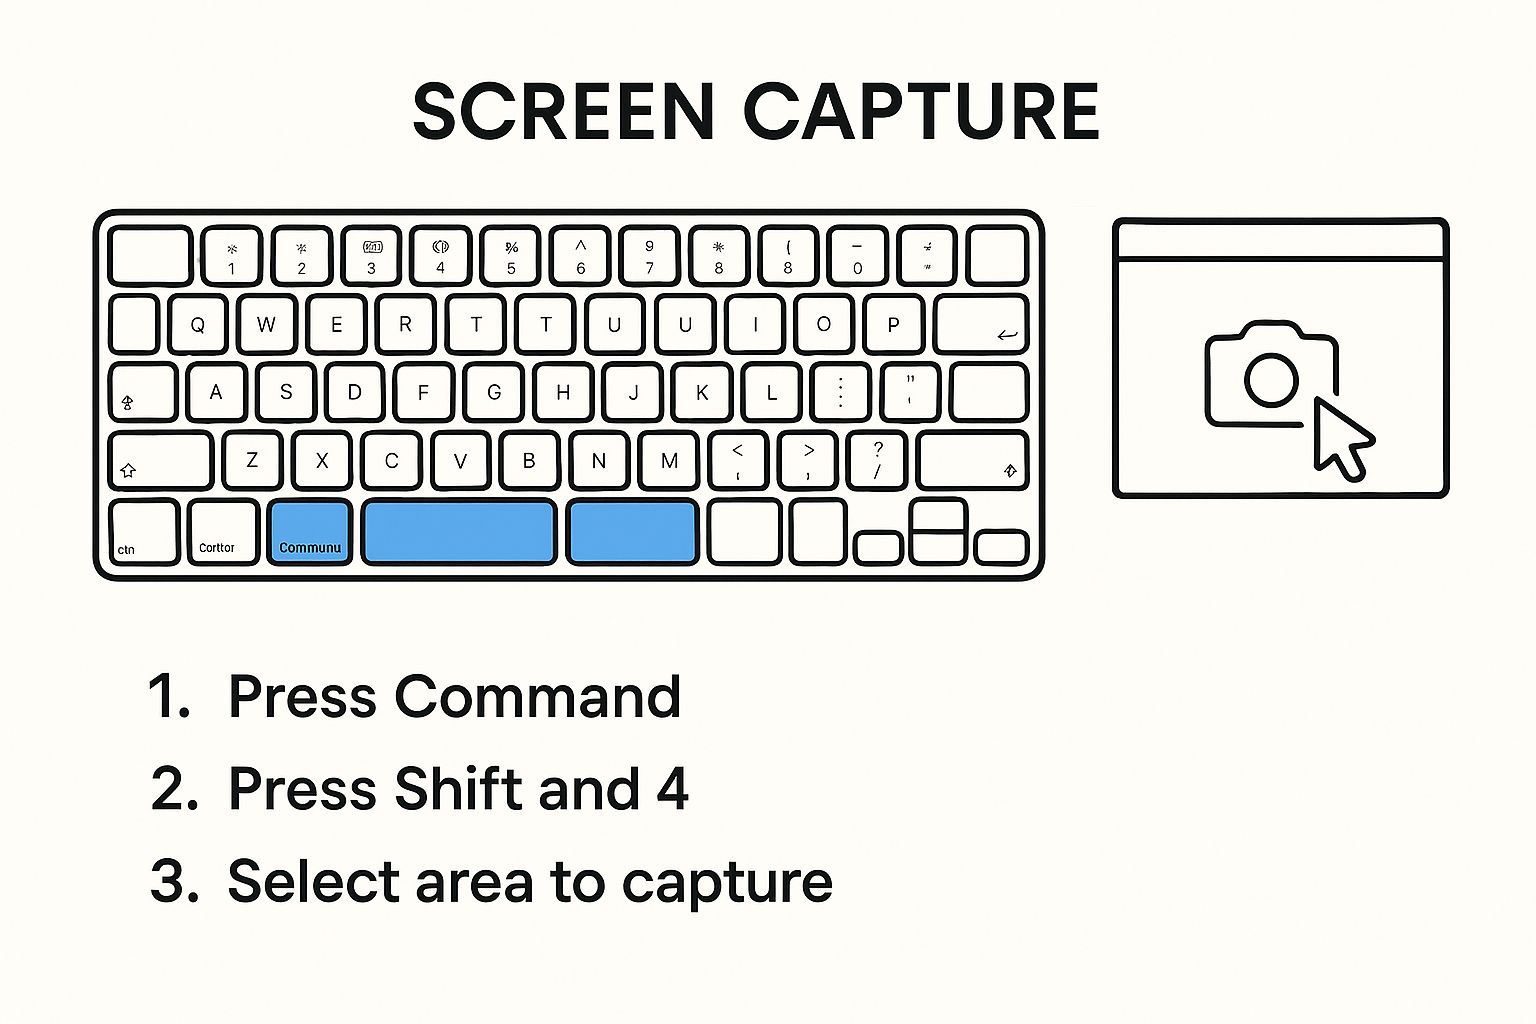
As you can see, the shortcut is a straightforward sequence. It’s one of those things that, once you learn it, you'll wonder how you ever lived without it.
The real beauty of this method is its precision. You get a clean, pixel-perfect image of just the window you need, with no distracting desktop icons or other apps cluttering up the background.
When you hover over a window with the camera icon active, the system gives you a clear preview.
The target window gets highlighted with a blue tint, so you know exactly what you’re about to capture before you even click. This simple visual confirmation eliminates any guesswork and guarantees you get the right shot on the first try, every time.
Essential Mac Screenshot Shortcuts at a Glance
For a quick refresher, here's a handy table of the most common screenshot commands built into your Mac. Each one is designed for a slightly different task.
| Action | Keyboard Shortcut | Best For |
|---|---|---|
| Capture a specific window | Command + Shift + 4, then Spacebar | Isolating a single application window with a clean border and shadow. |
| Capture a selected area | Command + Shift + 4 | Grabbing a specific portion of your screen with a crosshair selector. |
| Capture the entire screen | Command + Shift + 3 | Taking a snapshot of everything visible on your display(s). |
Keep this table in mind, and you'll be able to grab the exact screenshot you need in seconds, without ever having to open another application. It’s all right there at your fingertips.
Go Pro with the macOS Screenshot Toolbar
While the direct shortcut is fantastic for quick grabs, hitting Command + Shift + 5 is like pulling back the curtain on a whole control panel that many Mac users don't even know exists. This command brings up the Screenshot Toolbar, a small but incredibly powerful interface that gives you fine-grained control over every capture.
Think of it this way: the basic shortcut is a point-and-shoot camera, but this toolbar is your DSLR. Suddenly, you have a ton more options and creative freedom.
This little toolbar becomes your command center for more complex screen captures. Instead of just grabbing what's in front of you, you can really dial in the specifics. From here, you can choose to snap the entire screen, a hand-drawn selection, or—most importantly for our guide—a single, perfect window. It neatly bundles all the different screenshot methods into one place.
It’s way more than just a menu. It adds capabilities the simple shortcuts just don't have, completely changing how you screenshot a window on Mac.
Getting the Most Out of the Toolbar Options
The real magic of the Screenshot Toolbar is tucked away in its "Options" menu. Clicking this reveals a dropdown list of settings that can seriously level up your workflow. For instance, you can change where your screenshots land, sending them to a dedicated folder instead of cluttering up your Desktop.
But the feature I use most is the built-in timer. You can set a delay of 5 or 10 seconds before the Mac takes the shot, which is a total game-changer for capturing things that only appear for a moment.
Ever tried to screenshot a dropdown menu, but it vanishes the second you press the keyboard shortcut? The timer is the perfect solution. Just set a five-second delay, click to open the menu, and let your Mac snap the picture for you.
This simple delay makes it possible to create tutorials or document software quirks that would be nearly impossible to grab otherwise. It’s ideal for showing interactive states, what happens when you hover over an element, or those pesky pop-up notifications in action.
When Is This Advanced Method the Right Call?
The Command + Shift + 4 + Spacebar combo is my go-to for fast, no-fuss captures. But for anything more involved, I always pull up the Screenshot Toolbar.
Here are a few real-world situations where it really shines:
- Building a Step-by-Step Guide: If you need to capture a sequence of menus and submenus, the timer lets you set up each shot perfectly without fumbling with hotkeys.
- Documenting a Pesky Bug: The toolbar isn't just for stills; it also lets you record your screen. You can quickly show a developer the exact steps that trigger a bug, which is way clearer than trying to explain it in an email.
- Keeping Your Files Organized: Taking dozens of screenshots for a project? Use the Options menu to save them all directly into a "Project Screenshots" folder. It's so much more efficient than dragging them off your desktop later.
Learning to use this toolbar is a small time investment that pays off big, giving you the precision to capture exactly what you need, every time.
Pro Tips for Flawless Window Captures
Knowing the basic shortcut is great, but the real magic in how you screenshot a window on Mac comes from a few subtle tricks that the pros use. These aren't just minor tweaks; they're workflow boosters that save time and give you much cleaner results.
One of the best tricks is getting rid of the drop shadow that macOS automatically adds to every window capture. It looks nice, but it can be a real pain for design mockups or technical guides where you need crisp, clean edges.
Here’s how to do it: After hitting Command + Shift + 4 and pressing the spacebar, just hold down the Option key before you click to capture the window. The shadow vanishes. It's that simple.
Taming Your Screenshot Files
If you’re anything like me, your desktop can quickly turn into a sea of PNG files after a busy day of taking screenshots. It’s not just messy; it can actually eat up a surprising amount of storage. Some people have even found hidden macOS screen capture files causing their system data to balloon.
Thankfully, you can tell your Mac exactly where to save these files instead of just dumping them on the desktop.
- First, bring up the Screenshot Toolbar with Command + Shift + 5.
- Next, click on the “Options” menu.
- Under the “Save to” section, pick a different spot. I like to create a dedicated “Screenshots” folder inside my Documents to keep everything tidy.
Set this once, and you’ll never have to deal with a cluttered desktop again.
Here's another game-changer: switch the default file format from PNG to JPG. PNGs are great for quality, but the file sizes can be huge. If you're snapping hundreds of images for a project, moving to JPG will save a ton of disk space.
You can do this with a quick trip to the Terminal app. Just open Terminal, paste in this command, and hit Enter: defaults write com.apple.screencapture type jpg. It's little adjustments like these that turn a basic feature into a seriously powerful tool.
Take Your Screenshot from Good to Great with GrabShot.io
Once you've snagged that perfect window screenshot, you've only just begun. The raw image is useful, but turning it into a truly effective communication tool often requires a bit more finesse than what macOS offers out of the box. This is where a specialized tool like GrabShot.io comes in, letting you transform a basic capture into a clear, professional visual guide.
Think about the last time you tried to explain a process to a colleague. Instead of sending a plain screenshot followed by a wall of text, imagine using annotations to do the talking for you. You can drop in bold arrows to pinpoint specific buttons, add numbered steps to walk someone through a sequence, or draw clean boxes around key areas. Suddenly, your instructions are crystal clear and easy to digest.
This is the kind of professional touch GrabShot.io was built for, giving you a clean and intuitive canvas to work on.

All the tools you need are right there, making it simple to add that extra layer of polish.
Keep Private Info Private with Redaction Tools
Before you share any screenshot, it’s critical to double-check for sensitive information. Application windows are notorious for displaying personal data, client details, or confidential numbers. Just scribbling over text with a markup tool not only looks sloppy but can sometimes be undone.
GrabShot.io offers a much more elegant solution with its built-in blur and redaction features. A couple of clicks is all it takes to precisely obscure any private information, leaving you with a clean and secure image. Now you can share it confidently in a blog post, a support ticket, or a team presentation without worrying about accidental data leaks.
Using proper redaction tools isn't just about appearances—it's a crucial step in protecting privacy and upholding professional standards. It makes your screenshot truly ready to share.
Meet the High Bar for Professional Visuals
For developers, marketers, and anyone creating public-facing content, screenshot quality is non-negotiable. If you're submitting visuals to the Mac App Store, for example, they have to meet strict composition guidelines, often requiring the full app window to be shown in its desktop context.
Apple currently allows developers to upload up to 10 screenshots to feature their app, and each one needs to look its best. You can dive deeper into these requirements and even find ways to automate perfect Mac screenshots. By using GrabShot.io to annotate these captures, you can ensure every submission is as clear and polished as possible, helping your app stand out.
What to Do When Mac Screenshots Stop Working
It happens to the best of us. You go to snap a quick screenshot of a window, muscle memory kicking in as you press the keys, and… nothing. When the trusty Command + Shift + 4 + Spacebar combo suddenly fails, it's usually not a big system meltdown. More often than not, the fix is surprisingly simple and buried deep within your System Settings.
Most of the time, the problem is a "shortcut hijacking." Another app you've installed has claimed that key combination for its own purposes. This is especially common with productivity tools or utilities that run in the background. A quick dive into your settings can sort this out in just a minute or two.
Digging into Your Keyboard Shortcut Settings
Ready to find the culprit? Let's take a look at your Mac's keyboard settings to see what's really going on under the hood.
Here’s the path to follow:
- Open up System Settings (you might know it as System Preferences on older macOS versions).
- Find and click on Keyboard in the side menu.
- Hit the Keyboard Shortcuts… button.
- From the list on the left, select Screenshots.
You should now see a list of all the default screenshot commands. Check to make sure the boxes next to each one are ticked. If a box is unchecked, your Mac has turned off that specific shortcut. Just tick the box again, and it should start working immediately.
I’ve seen this happen a lot when people install new utility apps. A new clipboard manager or a menu bar organizer might assign itself a similar shortcut during setup, overriding the system default without you even realizing it.
If all the boxes are checked but the shortcut still isn't working, an active application is almost certainly the issue. The easiest way to pinpoint the problem is to start quitting your open apps one by one, testing the screenshot shortcut after each one. Once you find the app that's causing the conflict, you can usually dive into its own preferences and change its shortcuts, freeing up the macOS default and getting your workflow back on track.
Common Questions About Window Screenshots on Mac
Even once you've got the shortcuts down, a few questions always seem to come up. I've heard these a lot over the years, so let's clear up some of the finer points of capturing windows on your Mac.
Can I Screenshot a Window That's Hidden or in the Background?
Absolutely. This is one of the most useful but overlooked features. Let's say you need a shot of your Calendar app, but it's mostly covered by a browser window.
Just press Command + Shift + 4, then hit the Spacebar. When you hover over the sliver of the Calendar window that's visible, macOS is smart enough to highlight the entire thing. Click, and you'll get a perfect, clean screenshot of just that window, completely isolated from whatever was on top of it. No more rearranging your desktop just to get a clean shot.
How Can I Change the Default Screenshot File Type?
By default, every screenshot you take is saved as a PNG. PNGs are great for quality, but the file sizes can add up quickly. If you'd rather save them as smaller JPG files, a quick trip to the Terminal is all you need.
It's not as scary as it sounds. Here’s what to do:
- Open the Terminal app (you can find it in your Applications/Utilities folder).
- Copy and paste this exact command:
defaults write com.apple.screencapture type jpg - Hit Enter.
That's it. From now on, all your screenshots will be saved as JPGs. This is a real space-saver if you take a high volume of screenshots for work or projects.
Pro Tip: Want to skip saving a file altogether? Add the Control key to your shortcut. Pressing Command + Control + Shift + 4, then Spacebar, sends the window capture straight to your clipboard. It's incredibly efficient for quickly pasting an image into an email, Slack message, or document.
When you're ready to take your screenshots from simple captures to professional-looking visuals, check out GrabShot.io. It's built for annotating, redacting sensitive info, and making your images look amazing in just a few clicks. Give it a try for free at grabshot.io and see how much faster you can work.
Article created using Outrank