

Ever find yourself fumbling with your keyboard, trying to remember how to take a print screen on macbook? We've all been there. The most straightforward way is hitting Command-Shift-3, which instantly captures your entire screen. Think of this as the foundational shortcut—the one that started it all.
Your Guide to MacBook Print Screen Shortcuts
Taking a screenshot on your Mac shouldn't feel like a cryptic puzzle. Whether you're a developer documenting a bug, a marketer grabbing social media highlights, or just trying to save a digital receipt, knowing the right shortcuts makes the whole process effortless.
This guide gets straight to the point, covering the essential keyboard commands that turn a moment of frustration into a simple, second-nature action. These commands are baked right into macOS, so you don’t need any special software to get started.
You really only need to master three core methods:
- Full Display Capture: Grabs everything you see. Simple and effective.
- Specific Window Capture: Perfect for creating a clean, professional-looking image of a single app window.
- Selected Portion Capture: Gives you pixel-perfect precision to snag only the most important details.
Let's quickly break down these essential key combinations. They form the basis of all screenshot actions on a MacBook and are your go-to toolkit for any capture scenario.
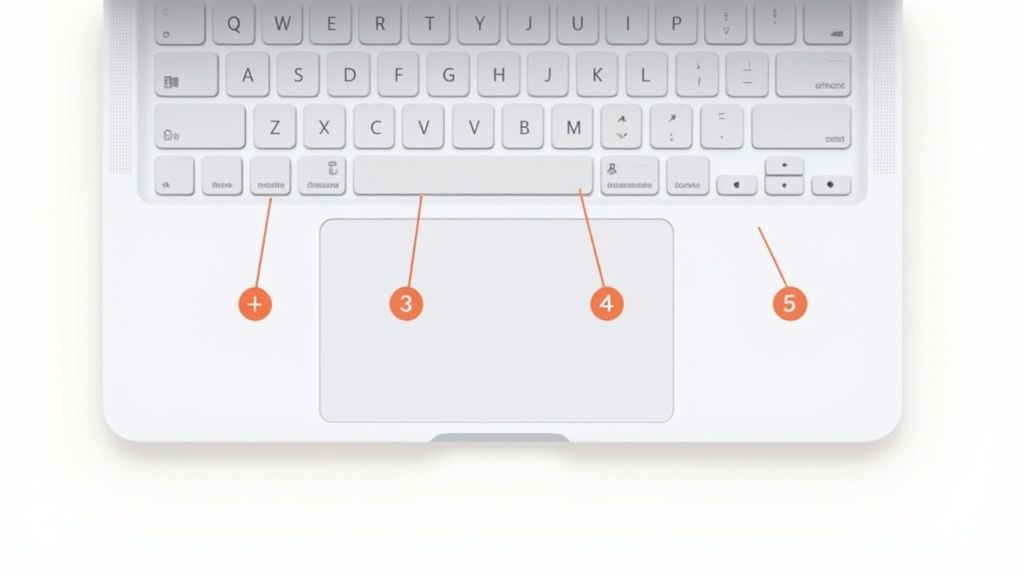
As the image shows, modifier keys like Command (⌘) and Shift (⇧) are the workhorses behind many powerful macOS functions, especially when it comes to taking screenshots.
For a quick reference, here’s a simple table summarizing the main shortcuts.
MacBook Screenshot Keyboard Shortcuts at a Glance
| Screenshot Type | Keyboard Shortcut | Best For |
|---|---|---|
| Full Screen | Command + Shift + 3 |
Capturing everything visible on your display at once. |
| Specific Window | Command + Shift + 4, then Spacebar |
Isolating a single application window or menu. |
| Selected Area | Command + Shift + 4 |
Grabbing a specific part of your screen with a crosshair. |
Keep this handy as we dive deeper into each method. You’ll find you quickly commit them to muscle memory.
The Foundation of Mac Screenshots
What's fascinating is how long these shortcuts have been around. The MacBook keyboard layout and its core commands have a history of incredible consistency. The Command-Shift-3 shortcut, for instance, has been the standard for capturing the entire screen since the early days of Mac OS X.
This command has remained unchanged across countless MacBook models and operating system updates. It really speaks to a core design philosophy: make the essential tools easy to remember and reliable. If you're curious, you can read more about the evolution of Mac keyboard commands and their impact on user experience over the years.
Capturing Your Entire Screen Instantly
When you need to grab everything on your display—every window, the menu bar, the dock, all of it—the full-screen screenshot is your go-to. I use this one all the time for a quick, no-fuss record of what's happening on my screen.
The shortcut is a classic: just press Command-Shift-3.
You’ll hear a satisfying camera shutter sound, and a little thumbnail preview will pop up in the bottom-right corner of your screen. That confirms your Mac snapped the picture.
Don't ignore that thumbnail! It’s actually a mini-control center for your new screenshot, giving you a few immediate options to streamline your workflow.
What to Do with the Thumbnail Preview
This is where you can really speed things up. Instead of hunting for the file on your desktop, you can act on it right away.
- Make Quick Edits: Click on the thumbnail, and it opens up a preview window. From here, you can crop out sensitive info, add some quick notes with the pen tool, or highlight something important.
- Share it Instantly: Need to send it over Slack or drop it into an email? Just drag the thumbnail directly from your screen into the app. It's incredibly fast.
- Let It Be: If you don't do anything, the preview will vanish after a few seconds. macOS automatically saves the screenshot as a file on your Desktop.
I find this shortcut indispensable for things like documenting a weird software bug for IT support or saving a full-page receipt after an online purchase. Anything that requires a complete, unaltered view of your screen is a perfect job for
Command-Shift-3.
This simple function is a powerhouse in professional settings. Consider that in 2020, about 75% of creative professionals reported using Macs, where screenshots are a daily part of giving design feedback. With an estimated 60 million Macs in use back then, this shortcut is practically muscle memory for a huge number of people. You can discover more about Mac usage trends in professional settings to get a sense of its impact.
Capturing a Specific Section of Your Screen
Sometimes, a full-screen grab is overkill. You don't need your messy desktop or extra browser tabs in the shot—you just need a specific chart, a paragraph of text, or a single icon. This is where precision comes in.
For these surgical captures, the go-to shortcut I use dozens of times a day is Command-Shift-4. Pressing this combination instantly transforms your cursor into a crosshair, ready for you to select exactly what you want.
It's a huge time-saver. You get a clean, focused image from the get-go, completely sidestepping the need to open an editor and crop out the noise later.

Just click and drag the crosshair over the area you need. When you release the mouse button, your perfectly cropped screenshot saves directly to your desktop. Simple as that.
Fine-Tuning Your Selection On the Fly
Ever start dragging your selection and realize it's just a few pixels off? It happens. The good news is you don't have to cancel and start over. macOS has a couple of brilliant keyboard modifiers that let you adjust your selection mid-drag.
Once you've started dragging to create the selection box, try this:
- Hold the
Spacebar: This is my favorite trick. It freezes the size of your selection box and lets you move the entire thing around the screen. It’s perfect for nudging the frame into the perfect position without having to guess your starting point again. - Hold the
Shiftkey: After you begin dragging, pressing and holdingShiftlocks the shape of your selection. You can lock it to be perfectly horizontal or vertical, which is incredibly useful for capturing long, narrow banners or tall columns of text with straight edges.
I constantly use this to grab specific charts from lengthy reports or capture a customer testimonial from a social media feed. It isolates the important information without any extra visual noise, which is essential for creating clean presentations or documentation.
Mastering these subtle adjustments is what makes the Command-Shift-4 shortcut so powerful. You can get a pixel-perfect result every time without ever leaving your screen. For anyone creating tutorials, building a mood board with web clippings, or just sharing snippets in Slack, this is how you get professional-looking captures in seconds.
Capturing a Specific App Window or Menu
Selecting a specific area is great, but what about when you need a perfectly cropped shot of just one app window? Trying to trace the edges with the selection tool is a recipe for frustration. You almost always end up with a bit of your desktop wallpaper peeking through, which just looks sloppy.
Fortunately, there’s a much more elegant way to do this.
It all starts with a familiar shortcut, Command-Shift-4, but with a small twist. Once you press that combination, instead of dragging your mouse, just tap the Spacebar. Your cursor will immediately change from the crosshairs into a nifty little camera icon.

Now, just hover that camera over any window on your screen. You'll see the window gets highlighted with a soft blue overlay, showing you exactly what will be captured. One click is all it takes. macOS snaps a perfect picture of that window, even including the subtle drop shadow for a clean, professional look. This is my go-to method for creating clean visuals for support guides or tutorials.
The Trick to Capturing Dropdown Menus
Ever tried to screenshot a dropdown menu only to have it vanish the second you press a key? It’s a common headache. This same window-capture trick is the solution.
Here’s the process that works every time:
- First, click to open the menu you want to grab. Keep it open.
- Next, press
Command-Shift-4and then tap theSpacebar. - Now, just move that camera icon right over the open menu.
- Click, and you've captured it perfectly before it has a chance to disappear.
I can't stress this enough: using the window capture shortcut is a game-changer. It guarantees your screenshots are perfectly framed every single time, saving you the hassle of cropping later. It’s a small detail that makes a massive difference in how professional your work looks.
Using the Screenshot App for Advanced Control
While the individual keyboard shortcuts are fantastic for quick grabs, sometimes you need more control. That's where the Mac's built-in Screenshot app comes in. It's a hidden gem that many users overlook.
You can summon this powerful little toolbar by pressing Command-Shift-5.
Instead of instantly taking a picture, this shortcut brings up a control panel at the bottom of your screen. It’s your one-stop shop for everything related to screen captures, consolidating all the options into one tidy interface.
From here, you can still snap the entire screen, a single window, or a custom area. But the real magic is in the extra tools it offers, especially if you're creating tutorials, recording a quick software demo, or just need more precision than a simple keystroke can give you.
Fine-Tuning Your Captures
The Options menu within this toolbar is where you can really start to customize your workflow. It gives you direct control over settings that would otherwise be a pain to change.
For example, you can finally stop your Desktop from getting buried in screenshots. I always recommend changing the save location to a dedicated folder. It’s a simple tweak that makes a huge difference in staying organized.
The Options menu also lets you:
- Set a Delay Timer: Add a 5 or 10-second timer. This is perfect for capturing dropdown menus or other interface elements that disappear as soon as you click away.
- Show Mouse Pointer: For any kind of instructional guide, including the cursor in the final image is a must-have for clarity.
- Remember Last Selection: If you find yourself repeatedly capturing the same part of the screen, this feature is a massive time-saver.
This centralized hub is just smart design. Instead of forcing you to memorize a half-dozen different shortcuts,
Command-Shift-5gives you a visual and intuitive control panel for pretty much any screen capture scenario you can think of.
This app, which first showed up in macOS Mojave back in 2018, was a huge step up for the old print screen on macbook keyboard function. It didn't just bring all the controls together; it also added robust screen recording, making it an indispensable tool for pros and educators. You can dive deeper into its features by checking out Apple's official guide.
Fine-Tuning Your Screenshot Settings
The default screenshot settings on your Mac are a good starting point, but they're not always the most efficient. If you're like me and take screenshots all day long, spending a few minutes customizing these options can seriously clean up your workflow and save you a ton of hassle later.
By default, every time you use a print screen on macbook keyboard shortcut, the image saves as a high-quality PNG. That’s great for clarity, but the file sizes can add up quickly. If you're more concerned with saving disk space, switching over to JPG is a really practical move.
Switching Up the Default File Format
You can change the file format with a single command line. Don't be intimidated—it's super simple.
First, open the Terminal app (you can find it in your Applications > Utilities folder). Once it's open, just type or paste this command and hit Enter:
defaults write com.apple.screencapture type jpg
And that's it. From now on, all your screenshots will be saved as space-saving JPGs. If you ever need to go back to PNG for higher quality, just repeat the command, swapping jpg with png.
Pro Tip: For this change to stick, you'll need to either restart your Mac or just log out and back in again. It’s a quick step that people often forget, but it ensures the new setting is applied correctly across the system.
Taming Your Save Location and Previews
Is your desktop a graveyard of old screenshot files? I know the feeling. The good news is you can tell your Mac exactly where to save them permanently.
Start by creating a dedicated folder somewhere logical, like a "Screenshots" folder inside your Documents. Next, open Terminal again and type the first part of this command:
defaults write com.apple.screencapture location
Now, instead of typing the folder path, just drag your new "Screenshots" folder from Finder and drop it directly into the Terminal window. It'll automatically fill in the correct path for you. Hit Enter, and say goodbye to desktop clutter.
Another little thing that can get in the way is that floating thumbnail that pops up in the corner after every screenshot. It’s handy for quick markups, but it can also be distracting. To turn it off, press Command-Shift-5 to bring up the Screenshot app's toolbar. Click on Options and simply uncheck Show Floating Thumbnail. It's a small tweak, but it makes the whole process feel much cleaner.
Answering Your Top MacBook Screenshot Questions
Once you have the basic shortcuts down, you'll inevitably run into those tricky situations that leave you wondering. I've been there. Let's walk through some of the most common questions people ask about taking screenshots on a Mac, so you can handle any capture like a pro.
One of the first things everyone asks is, "Where the heck did my screenshot go?" It's a great question, because a desktop cluttered with "Screen Shot 2023-10-27…" files can get messy, fast.
Where Do MacBook Screenshots Go by Default?
Out of the box, your Mac saves every single screenshot directly to your Desktop. Each file gets a timestamp for a name, like Screen Shot 2023-10-27 at 10.30.00 AM.png.
If you'd rather keep things tidy, you can easily change this. Just hit Command-Shift-5 to bring up the Screenshot app's toolbar. Click the 'Options' menu, and you can tell your Mac to save all future captures to a different folder, like Documents or a dedicated "Screenshots" folder you create.
How Can I Copy a Screenshot Instead of Saving It?
Sometimes you don't need a file; you just want to quickly paste an image into a Slack message, an email, or a Google Doc. This is a huge time-saver.
All you have to do is add the Control key to your usual shortcut.
- Copy the entire screen: Press
Control-Command-Shift-3. - Copy a specific area: Press
Control-Command-Shift-4.
This sends the image straight to your clipboard. From there, just use the universal paste command (Command-V) to drop it wherever you need it. No file, no fuss.
Ever tried to screenshot a dropdown menu, only to have it disappear the second you click to start the capture? It’s infuriating. A timed screenshot is your secret weapon for capturing these fleeting on-screen elements.
How Do I Take a Timed Screenshot?
This is one of my favorite hidden features. Hit Command-Shift-5 to open the Screenshot utility. In the 'Options' menu, you’ll see choices for a 5-second or 10-second timer.
Select your timer, frame the shot, and click. You’ll see a little countdown on your screen, giving you just enough time to open that menu or hover over the element you need to capture before the shutter snaps.
Is It Possible to Screenshot the Touch Bar?
Yes, you absolutely can! If you have a MacBook Pro with a Touch Bar, Apple created a dedicated shortcut just for this.
Simply press Command-Shift-6. This instantly captures the current state of your Touch Bar and saves it to your desktop as a long, thin image file. It works just like the other screenshot commands.
Now that you're a screenshot master, the next step is making those captures look incredible. Raw screenshots are fine, but polished ones get noticed. I use GrabShot.io for this. It’s a super simple, browser-based tool that lets you drop in any screenshot and instantly add professional backgrounds, redact sensitive info, and apply beautiful styling. It’s the fastest way I’ve found to create images that are ready to share.