

Before you can pop a screenshot into a document or email, you’ve got to grab it first. On a Mac, this all starts with a few key presses. The most common shortcuts are Command-Shift-3 for a full-screen grab, Command-Shift-4 for a specific selection, and Command-Shift-5, which brings up a handy control panel with all the options in one place.
Getting these commands into your muscle memory is the first real step to speeding up your workflow.
Mastering Mac Screenshots from Capture to Clipboard
Knowing which shortcut to use is what makes all the difference. Sure, grabbing the entire screen is easy, but it often captures a lot of visual noise—your messy desktop, other open apps, the menu bar, etc. The real magic happens when you get precise.
Choosing The Right Capture Method
Let's say you need to send an IT ticket with a specific error message. Using Command-Shift-4 and dragging a neat little box around just the error dialog is the way to go. It’s clean, focused, and gets straight to the point without any extra distractions.
On the other hand, if you're putting together a tutorial or a presentation and need to show a whole application window, try this trick: press Command-Shift-4, and then hit the Spacebar. Your cursor will turn into a camera, letting you click on any window to capture it perfectly, complete with a professional-looking drop shadow.
This visual guide breaks down the best methods for different situations.
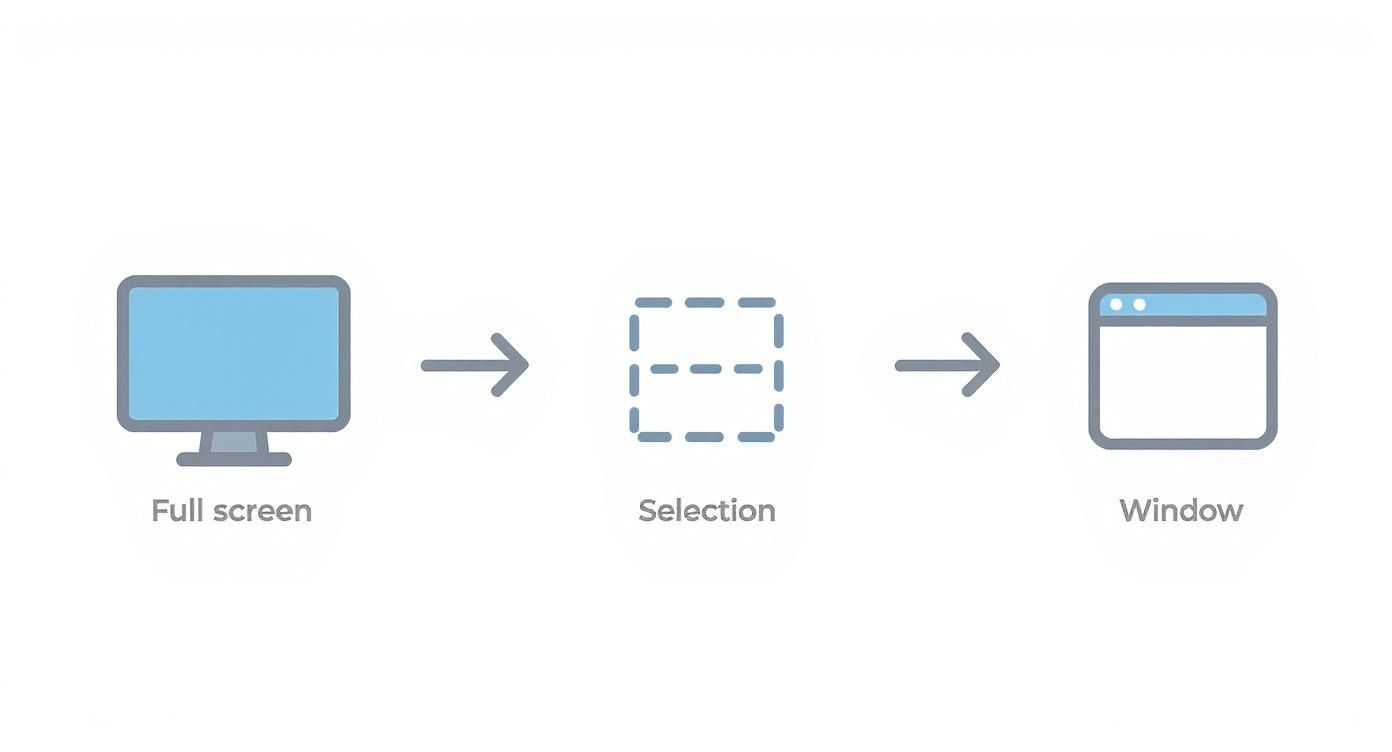
As you can see, each command is built for a specific purpose, helping you get exactly the shot you need without any extra editing later.
Your Screenshot Control Center
For the most control, your go-to command should be Command-Shift-5. This shortcut opens up the Screenshot app's on-screen toolbar, which is basically your command center for all things screen capture.
From this little panel, you can choose to capture a window, a selected area, the entire screen, or even start a screen recording. It’s incredibly versatile.
The real game-changer here is the Options menu. This is where you can tell your Mac exactly where to save your screenshots. Instead of cluttering your Desktop, you can send them straight to a specific folder, to the clipboard for immediate pasting, or to another app.
The evolution of the screenshot function really highlights Apple’s commitment to a seamless user experience. Tools that were once basic have grown into a powerful, integrated system, especially since macOS Mojave. You can find out more about the history of Mac's screenshot capabilities to see how far it's come.
To help you remember the essentials, here's a quick cheat sheet.
Essential Mac Screenshot Shortcuts at a Glance
| Shortcut | Action | Best For |
|---|---|---|
| Command-Shift-3 | Captures the entire screen | Quickly showing everything visible on your displays. |
| Command-Shift-4 | Captures a selected portion | Grabbing a specific error message, chart, or part of a webpage. |
| Command-Shift-4 + Spacebar | Captures a specific window | Creating clean, professional images of an application for tutorials. |
| Command-Shift-5 | Opens the Screenshot app panel | Accessing all options, including screen recording and save locations. |
Keep these commands handy, and you'll find that capturing what you need is the easy part. Once you've got your image, dropping it into your work is just a click or a paste away.
The Clipboard Trick for Instant Pasting
Let's be honest, saving a screenshot to your desktop just to drag it into an app is a clunky workflow. It wastes time and clutters your screen with temporary files you'll just have to delete later. There’s a much faster way: send your screenshot directly to the clipboard.
This one little change makes the whole process feel seamless. The secret? Just add the Control key to your usual screenshot command. When you do this, the Mac skips saving a file and instead holds the image in its memory, ready for you to paste anywhere you need it.
Putting the Clipboard to Work
Think about a common task, like giving a colleague feedback on a design in Slack. The old way involves taking a screenshot, finding the file on your desktop, and then dragging it into the chat.
The clipboard method is a game-changer. Just press Control-Command-Shift-4, select the area you want to capture, and then switch to Slack and hit Command-V. The image appears right in the message box. It's that fast.
Here are a few other ways I use this all the time:
- Reporting a bug to IT: When an error message pops up, I use Control-Command-Shift-4 to grab it and paste it straight into my support email.
- Creating a presentation: I can snag a chart from a report online and drop it directly into a slide in Keynote or PowerPoint without saving a single file.
- Writing instructions: It's perfect for quickly adding UI elements into a Google Doc or a Pages document.
Think of the clipboard as a temporary holding pen for your images. This trick is ideal for those "one-and-done" screenshots you don't need to keep, leaving your desktop pristine.
If you learn just one thing to speed up your screenshot game, make it this. It keeps you in the flow of your work instead of getting bogged down with managing files.
Getting Your Screenshots Where They Need to Go
You've captured the perfect screenshot. Now what? Getting that image out of limbo and into your document, email, or slide deck is the next step, and thankfully, macOS makes this incredibly easy. Whether your screenshot is sitting on your desktop or copied to your clipboard, you have a couple of fantastic, intuitive options.
The quickest way by far is the good old paste command. If you used the Control key modifier when taking your shot (which copies it directly to your clipboard), just click inside your app and hit Command-V. I use this constantly for dropping images into Slack messages or quick emails—it's a seamless part of my workflow that doesn't require saving a file first.

For screenshots that saved as files on your desktop, drag-and-drop is your best friend. It feels so natural. Just grab the file, drag it over to your application window, and let go. It pops right in.
Putting It Into Practice: Real-World Examples
Let's walk through a common scenario. You're putting together a report in Microsoft Word and need to show a graph from a website.
- First, you'd grab the specific area with Command-Shift-4.
- The screenshot file instantly appears on your desktop.
- From there, you just drag that file and drop it right where you need it in your Word doc.
This same logic applies everywhere. Building a presentation in Keynote or PowerPoint? You can drag a whole series of screenshots onto a slide and arrange them. Working in a web app like Google Docs or Asana? The same drag-and-drop motion works flawlessly.
The real beauty of the Mac ecosystem is this consistency. The core mechanics of pasting from the clipboard or dragging a file from the desktop work the same whether you're in an Apple app like Pages or a third-party one like Outlook. You don't have to relearn the basics every time you switch programs.
Different Apps, Slightly Different Workflows
While pasting and dragging will handle 90% of your needs, some apps offer a more formal "Insert" function that gives you a bit more control. In programs like Word or Pages, you can go up to the menu bar and find an option like Insert > Picture > From File….
This opens a Finder window, letting you navigate to exactly where your screenshot is saved. This is my go-to method when I'm working on a more organized project. For instance, if I'm creating a user manual, I save all my annotated screenshots in a specific project folder. Using the "Insert From File" command ensures I’m pulling the correct version from its proper home, not just a random file I left on my desktop.
Ultimately, knowing when to use a quick paste versus a more deliberate "Insert" is what separates the beginners from the pros. Both will make you incredibly efficient once you get the hang of them.
Advanced Tips for Managing Your Screenshots
So, you've mastered the basics of taking and pasting screenshots. That's a great start, but the real magic happens when you learn how to manage them efficiently. It’s what separates a casual user from a productivity pro. The key is that little thumbnail preview that pops up in the corner of your screen right after you take a shot.
Don't just let it fade away! Clicking that preview immediately opens the Markup tool, and here's the best part: it does this before the file is even saved. This is your golden opportunity to make quick edits on the fly. You can crop out sensitive information, draw an arrow to highlight a specific button, or add a quick text note. It's so much faster than saving the file, finding it, and then opening it in another app.

Organize Your Captures Like a Pro
By default, macOS dumps every single screenshot onto your Desktop. If you take a lot of them, this turns your workspace into a cluttered mess in no time. A much cleaner approach is to tell your Mac to save them somewhere else.
Changing the save location is a simple, one-time fix:
- Hit Command-Shift-5 to bring up the Screenshot app toolbar.
- Click on the "Options" menu.
- Look for the "Save to" section and pick a different folder, or choose "Other Location…" to create a brand-new folder just for your screenshots. I personally use a folder called "Captures" inside my Documents folder.
This small tweak keeps your Desktop pristine and all your screenshots right where you expect them to be.
Another little trick is changing the file type. Your Mac saves screenshots as PNGs, which are great for quality but can be pretty big files. If you're more concerned about saving disk space, you can switch the default to JPG.
Supercharge Your Workflow with Third-Party Apps
The built-in screenshot tools are fantastic, but dedicated apps can really elevate your workflow. A tool like CleanShot X is a game-changer, offering features you just can't get natively. Think capturing a full-length scrolling webpage in one go, or grabbing a long conversation in a messaging app. They also tend to have more robust annotation tools and can automatically upload your shot to the cloud and copy a sharing link to your clipboard.
The introduction of more advanced screenshot tools in macOS Mojave back in 2018 sparked a major shift in user behavior. Since then, screen capture usage has reportedly grown by over 30% annually, as professionals now rely on features like instant editing and clipboard copying for their daily tasks. You can learn more about how these features changed user workflows.
When you start combining these habits—using Markup for instant edits, setting a dedicated save folder, and maybe even exploring a third-party app—you'll find that the way you insert screenshot Mac visuals becomes a genuinely smooth and professional part of your process.
What to Do When Mac Screenshots Aren't Working
Every now and then, even on a Mac, things can go a little sideways. One day your screenshot shortcuts are working perfectly, and the next, nothing. Don't worry, this is almost always an easy fix.
Most of the time, the problem is buried in your settings. A system update or a newly installed app can sometimes disable the shortcuts you use every day.
To get them working again, head over to System Settings > Keyboard > Keyboard Shortcuts > Screenshots. You'll see the list of all the screenshot commands. Just make sure the boxes next to the ones you use are checked. That usually does the trick.
Missing Thumbnail Previews?
Another common headache is when that handy little thumbnail preview in the corner of your screen vanishes. That preview is my go-to for quick markups, so I know how frustrating it is when it's gone.
Thankfully, bringing it back is simple. Just press Command-Shift-5 to pull up the main screenshot toolbar. Click on the "Options" menu you see there and ensure "Show Floating Thumbnail" has a checkmark next to it. Problem solved.
It's easy to take these integrated tools for granted, but they have a long history. Apple’s acquisition of NeXT back in 1997 laid the groundwork for the modern Mac OS, which included built-in screenshot tools from the early days of OS X. It was a huge step up from the clunky methods we used before. You can see how these features evolved over time in this timeline of Apple's innovations.
Can't Paste Your Screenshot?
Finally, what if you've copied a screenshot to your clipboard but a specific app just won't let you paste it? It happens. Some applications, for whatever reason, don't play nicely with pasted images.
The workaround is to insert the screenshot file manually. Instead of copying to the clipboard, save the screenshot to your desktop. Then, inside the app, look for an "Insert Image" or "Insert from File" option to place it exactly where you need it.
Got Questions? We've Got Answers
Even after you've mastered the basics, a few tricky situations can pop up when you're working with screenshots on a Mac. Let's tackle some of the most common questions people run into so you can get back to your project without missing a beat.
How Can I Stop Screenshots from Saving to My Desktop?
By default, every screenshot you take lands right on your desktop. While convenient for a moment, it can quickly lead to a sea of clutter. Thankfully, changing this is incredibly easy.
Hit Command-Shift-5 to open the Screenshot utility. Look at the toolbar that appears on your screen and click on "Options." You’ll see a "Save to" section at the top. From here, you can redirect your screenshots to a more organized spot, like your Documents folder or a dedicated "Screenshots" folder you've created.
Pro Tip: I often set my screenshots to save directly to the Clipboard. This is perfect when you just need to quickly paste an image into an email, chat, or document without creating a file you'll have to delete later. It's a real time-saver.
Is It Possible to Screenshot Just the Touch Bar?
Absolutely. While it's a niche need, it's super helpful for creating guides or troubleshooting. Apple actually built a dedicated shortcut just for this.
Press Command-Shift-6. That’s it. Your Mac will instantly save a wide, skinny image of whatever is currently displayed on your Touch Bar. Just like other screenshots, it will save to your default location (likely your desktop unless you've changed it).
Help! My Screenshot Won't Paste. What Do I Do?
This is probably the most common roadblock people face. You've captured the perfect shot, copied it to your clipboard, but when you press Command-V, nothing happens. What gives?
Nine times out of ten, the problem isn't with your Mac or the screenshot—it's the app you're trying to paste into. Some applications just don't play nicely with image data pasted directly from the clipboard.
The foolproof solution is to bypass the clipboard altogether. Instead of copying, save the screenshot as a file.
Once the image file is on your desktop or in a folder, you can insert it manually:
- Use the app's menu, often found under Insert > Picture > From File…
- Look for the familiar paperclip icon to "attach" or "insert" the image file.
- Or, my personal favorite: just drag the screenshot file from Finder and drop it directly into the app window.
This drag-and-drop method is the most reliable way to insert a screenshot on your Mac, and it works in virtually every application, from Microsoft Word to your email client.