

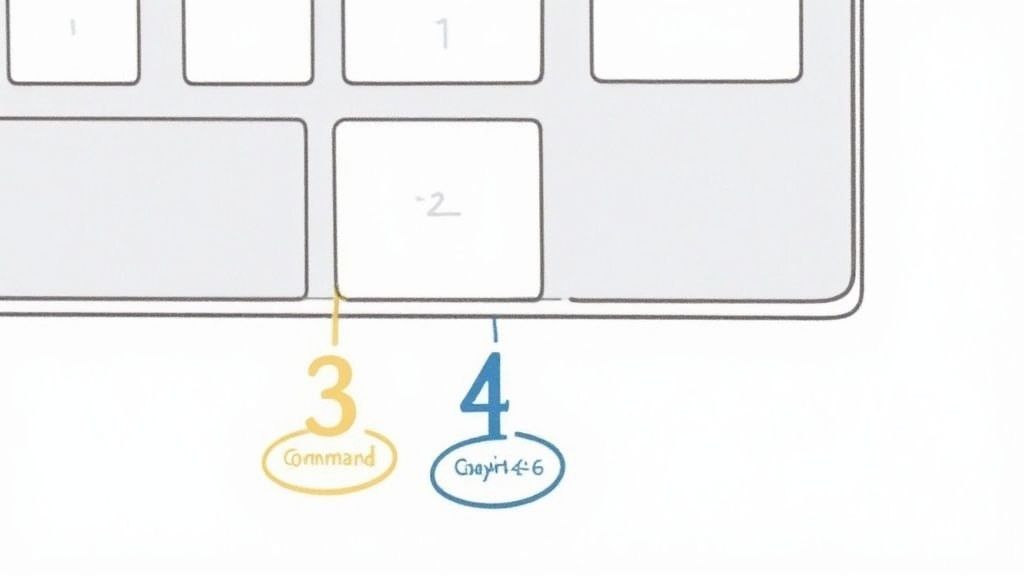
The quickest way to grab a screenshot on a Mac is by using a keyboard shortcut. It's a skill you'll use every single day. For your entire screen, just hit Command-Shift-3. If you only need a piece of it, use Command-Shift-4, then click and drag to select the exact spot.
Mastering the Essential Mac Screenshot Shortcuts
Getting these fundamental shortcuts into your muscle memory is a massive productivity boost. I use them constantly—whether I'm sending a quick visual bug report to a teammate, saving a digital receipt, or creating step-by-step guides.
The native tools baked right into macOS are surprisingly robust. For most people, they're all you'll ever need. In fact, studies across the US, UK, and Australia found that around 87% of Mac users stick with these built-in shortcuts over downloading a separate app.
For a quick reference, here are the main shortcuts you'll want to memorize.
Mac Screenshot Shortcuts at a Glance
| Shortcut Combination | Action | Best For |
|---|---|---|
Command-Shift-3 |
Captures the entire screen | Showing the full context of your desktop or an entire app window. |
Command-Shift-4 |
Captures a selected area | Grabbing a specific chart, paragraph, or part of an image. |
Command-Shift-4 + Spacebar |
Captures a specific window | Isolating a single application window with a clean border and shadow. |
These three commands cover the vast majority of situations you'll encounter.
Capturing Your Entire Screen
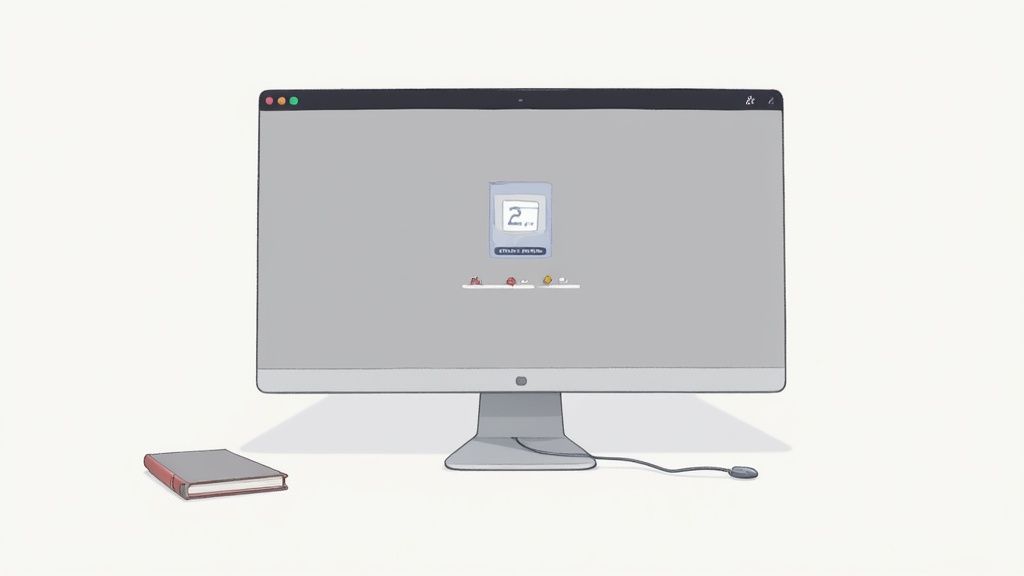
When you need to show everything at once, Command-Shift-3 is the command. As soon as you press it, your Mac snaps a picture of your whole display.
A little thumbnail preview pops up in the bottom-right corner of your screen. You can either click it to make quick edits or just let it be, and it'll save directly to your Desktop after a few seconds. This is perfect for showing the full context of your work, menu bar and all.
Here’s exactly what that little preview looks like right after you take the shot.
This instant feedback is great for checking if you got what you wanted without having to hunt for the file first.
Selecting a Specific Area or Window
For more precise captures, Command-Shift-4 is your best friend. The moment you press it, your cursor turns into a crosshair. Just click and drag a box around the part of the screen you want to capture, and you're done.
Pro Tip: Here’s a trick I use all the time. After hitting Command-Shift-4, tap the Spacebar. Your cursor will switch to a camera icon. Now, just hover over any window and click—it will capture that window perfectly, complete with its drop shadow.
This method is fantastic for isolating exactly what you want to share, cutting out all the clutter from your desktop or other open apps. If you're curious about other keyboard commands, you can learn more about how the print screen function works on a MacBook.
Going Beyond Shortcuts with the Screenshot App
While keyboard shortcuts are fantastic for quick snaps, sometimes you need more control. That's where pressing Command-Shift-5 comes in. This command brings up a powerful on-screen toolbar that acts as your mission control for screen captures. It's the difference between a quick photo and a carefully framed shot.
This little toolbar lays out all your options visually, so you can forget about memorizing a dozen different key combinations. With just a click, you can switch between capturing the whole screen, a specific app window, or a custom-selected area.
This kind of built-in functionality is a big reason why recent macOS versions have become so popular, now running on over 44% of Macs worldwide. Apple keeps adding these thoughtful features to its core tools. You can dig into the specifics of macOS version adoption rates to see just how quickly users embrace these updates.
Mastering the Toolbar Options
The real magic happens when you click the "Options" menu on that toolbar. This is where you can solve all those little screenshot annoyances and really dial in your workflow.
Here are a few game-changing settings I use all the time:
- Set a Timer: Have you ever tried to screenshot a dropdown menu, only for it to disappear the moment you press the keys? It’s beyond frustrating. Setting a 5 or 10-second timer is the perfect fix. It gives you a few seconds to trigger the capture, open the menu, and let your Mac grab the shot.
- Change Save Location: By default, macOS loves to dump every screenshot right onto your Desktop, creating a sea of clutter. From the Options menu, you can tell it to save them to a dedicated "Screenshots" folder, Documents, or even straight to your clipboard for pasting into a message or document.
- Show Mouse Pointer: This is a lifesaver for anyone creating tutorials or how-to guides. Just check this box, and your cursor will be included in the final image, pointing exactly where you need it to.
The Screenshot app gives you a level of precision that shortcuts alone just can't match. It’s what elevates a simple grab into a clear, thoughtfully composed image that gets your point across.
And don't forget, this tool is also your gateway to screen recording. You can switch from capturing a static image to recording a video of your screen with a single click.
Customizing Your Screenshot Workflow
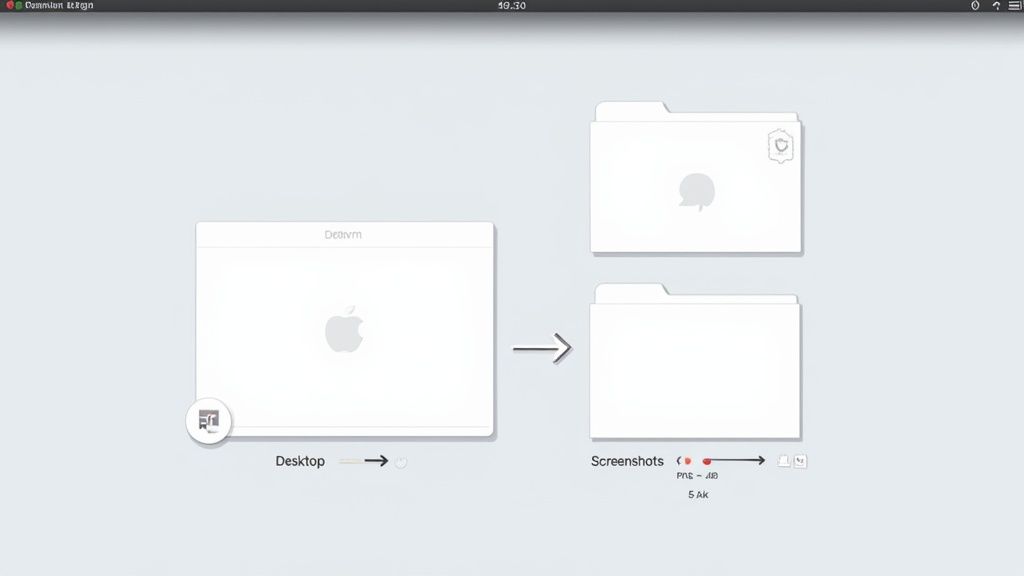
Knowing how to take a screenshot on a Mac is the easy part. The real challenge? Managing all the files you create. By default, every single capture lands directly on your Desktop, and it doesn't take long for that to turn into a chaotic mess.
But with a few quick tweaks, you can transform this simple function into a powerful, organized part of your daily routine.
Let's start by taking control of where your screenshots end up. After all, a cluttered desktop is a productivity killer.
Designate a New Save Location
To stop the chaos before it starts, bring up the Screenshot app's toolbar by pressing Command-Shift-5. From there, click on "Options." The first thing you'll see is the "Save to" section.
I always create a dedicated "Screenshots" folder inside my Documents. This keeps my workspace clean and makes it incredibly easy to find a specific image later.
Taking a moment to set a dedicated save location is the single best change you can make. It keeps your Desktop functional and ensures you can always find the exact capture you need later on.
This one simple adjustment saves you from having to constantly drag and drop files just to keep things tidy.
Optimize Your File Format
By default, macOS saves screenshots as high-quality PNG files. They look crisp and clear, but the file sizes can be surprisingly large. If you're conscious of disk space or often share screenshots online, switching to JPG is a smart move. JPGs are much smaller, which is perfect for web use or email attachments, though you might notice a very minor trade-off in image quality.
Another handy tweak is to disable the floating thumbnail that pops up after each capture. While it's useful for quick edits, it can also get in the way when you're working quickly. In that same "Options" menu, just uncheck "Show Floating Thumbnail." Your screenshots will then save instantly and silently in the background.
Fine-tuning these small details makes a huge difference. Once you've captured the perfect shot, you can learn more about how to insert your screenshot into documents on a Mac to complete your workflow.
Advanced Techniques for Pro-Level Screenshots
Alright, now that you've got the basic Mac screenshot commands down, let's get into some of the lesser-known tricks I use all the time. These are the small adjustments that separate a good screenshot from a great one, giving your captures a much more polished and intentional look.
For example, have you ever noticed that default drop shadow macOS adds to window captures? It looks nice, but it can be a real pain for technical documentation or when you're layering images in a design. The shadow just gets in the way.
Good news—you can capture a window without it. Just use the standard window capture shortcut (Command-Shift-4, then hit the Spacebar), but hold down the Option key as you click. The result is a clean, flat image of just the window. It’s a tiny change, but it makes a massive difference in professional work.
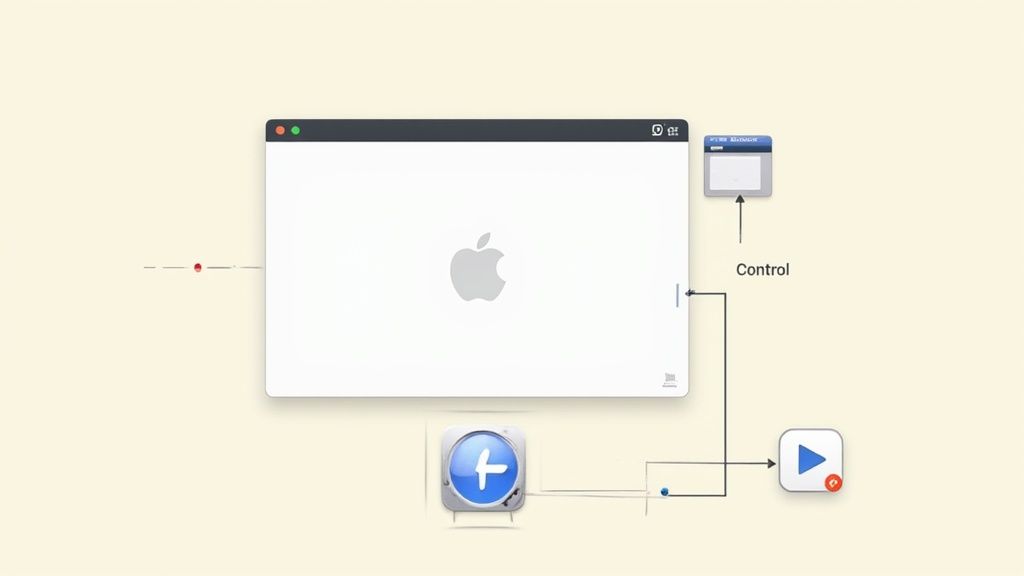
The Ultimate Productivity Hack: The Clipboard Workflow
Let's be honest, saving every single screenshot to your Desktop is clutter. Most of the time, I just need to quickly share something in a Slack message or an email, not save it forever. This is where the clipboard workflow comes in, and it's a total game-changer.
The secret ingredient is the Control key.
Add the Control key to your usual screenshot shortcut. For example, instead of just Command-Shift-4, press Control-Command-Shift-4. Select your area as usual, and instead of creating a file, your Mac copies the image directly to the clipboard. Then, just hop over to your app and hit Command-V to paste.
This clipboard method is my go-to for rapid-fire communication. It completely skips the whole process of saving, finding, and attaching a file. You go from capture to paste in a single motion.
Capturing Niche Elements Like the Touch Bar
If you're using a MacBook Pro, you might run into a situation where you need to show what's on your Touch Bar. It seems tricky, but Apple built a surprisingly simple command for it.
Just press Command-Shift-6.
That’s it. Your Mac instantly snaps a picture of your Touch Bar's current state and saves it to your Desktop as a long, thin image file. It's incredibly useful for creating tutorials or documenting custom app controls. Once you have these pro-level tricks in your back pocket, you're ready for pretty much any screen capture scenario.
Polishing Your Captures for Professional Use
Nailing the keyboard shortcut to snap a screenshot is only half the battle. A raw capture is a good start, but a truly great screenshot does more than just show what's on your screen—it tells a story and guides the viewer.
This is where you shift from just documenting to actually communicating. Think about it: instead of sending a cluttered, plain screenshot, what if you could add an arrow to highlight a critical button? Or blur out sensitive customer data? Or even add numbered steps to walk a colleague through a new process? These simple tweaks make a world of difference.
With remote work being the new normal, this skill has become essential. In fact, 68% of professionals now rely on screenshot tools for their daily work, whether it's for documentation, reporting, or just collaborating with the team. You can dive deeper into how smartphones are shaping modern work habits to see just how visual our communication has become.
Adding Professional Touches with GrabShot.io
This is exactly why tools like GrabShot.io exist. They bridge the gap between a basic Mac screenshot and a professional-grade visual, all without firing up clunky photo editing software. With just a few clicks, you can wrap your image in a clean background, add a browser frame for context, or even place it inside a device mockup for a polished, modern feel.
A great screenshot doesn't just show something; it explains something. By adding simple annotations and a clean background, you guide the viewer's eye and make your point instantly understandable.
This is a game-changer for anyone creating tutorials, marketing assets, or detailed bug reports. You can take a messy desktop capture and instantly turn it into a focused, branded image that’s ready for your blog, a social media post, or a support ticket.
For example, here's a simple screenshot that's been enhanced with a subtle gradient background and some breathing room using GrabShot.io.
See how the added space and clean background immediately draw your attention to the user interface? All the desktop clutter is gone, leaving only what matters.
This is so much more powerful than a simple crop. Using a dedicated screenshot editing tool, you can apply consistent branding across all your visuals, create templates for different needs (like a perfect Twitter image or a LinkedIn post), and make sure everything you share looks intentional. It's the final, crucial step in mastering how to do a screen shot on Mac.
Common Mac Screenshot Questions Answered
Even once you've memorized the keyboard shortcuts, you'll inevitably run into those little quirks that can trip you up. Let's walk through some of the most common questions I hear about taking screenshots on a Mac, with practical answers to get you past those frustrating hurdles.
Where Do Mac Screenshots Go?
By default, every screenshot you snap lands right on your Desktop. macOS names each one with a timestamp, so you'll see files like “Screen Shot 2023-11-20 at 11.45.10 AM.png.”
This is handy for a quick grab, but it doesn't take long for your Desktop to become a sea of screenshots. To keep things tidy, you can change where they're saved.
Simply press Command-Shift-5 to pull up the screenshot utility. From there, click on the “Options” menu and pick a different folder. I personally have a dedicated "Screenshots" folder to keep my workspace clean.
Capturing Disappearing Menus
Ever try to capture a dropdown menu, only to watch it vanish the second you press a key? It’s a classic problem, but there's an easy fix: the built-in timer.
- Open the screenshot toolbar with Command-Shift-5.
- Click Options and choose either a 5 or 10-second delay.
- Click to start the capture, then quickly open the menu you need to grab.
The screenshot will snap automatically after the timer runs out, freezing that elusive menu in place. No more frustrating misses.
The timer is one of those simple features that's a total game-changer. It turns what feels like an impossible task into a hands-free, perfectly timed capture.
Changing the Default File Type
Your Mac saves screenshots as PNG files. While PNGs are incredibly sharp and clear, they can also be pretty large. If you’re trying to save space or need a more web-friendly format, you can switch the default to JPG.
Just open the Terminal app, paste in the following command, and hit Return:
defaults write com.apple.screencapture type jpg
That one little line tells your Mac to save all future screenshots as compressed JPGs. If you ever want to go back to the higher-quality PNGs, just run the same command again, swapping "jpg" with "png."
Ready to take your captures from basic to brilliant? With GrabShot.io, you can instantly add beautiful backgrounds, professional device mockups, and helpful annotations. It's the perfect way to make your screenshots stand out without wrestling with complicated design tools. Give it a try for free at GrabShot.io.